Introduction
Fishing from a kayak is one of the fastest-growing outdoor sports in the world. Kayaks offer affordability, stealth, and access to shallow waters that big boats can’t reach. But kayak anglers also face a big challenge: limited visibility below the surface. That’s why a kayak fish finder is one of the most valuable tools you can bring on the water.
With sonar, GPS, and mapping, a fish finder transforms your experience. It reveals depth, structure, and schools of baitfish you would never see otherwise. But with so many models available in 2025, how do you choose the right one? The answer depends not only on your budget but also on your fishing style.
In this guide, we’ll break down everything you need to know about selecting the best kayak fish finder for your style of fishing. Whether you’re a beginner on small lakes, an explorer chasing new waterways, or a tournament angler needing pro-level live sonar, you’ll find the right match here. We’ll also include insights inspired by KayakBasics.com, a site that specializes in tips and gear advice for paddlers.
Why a Kayak Fish Finder Matters
Efficiency
Kayak fishing is all about efficiency. With only a paddle or pedal drive, every minute wasted moving from spot to spot costs you energy. A kayak fish finder lets you identify productive areas quickly, saving time.
Safety
Modern fish finders often include GPS mapping and waypoints. If fog rolls in or you drift farther than planned, you’ll always know your way back.
Catch More Fish
Instead of blindly casting, you’ll see structure, drop-offs, vegetation, and schools of fish. Over time, you’ll learn patterns that help you consistently increase your catch.
Confidence
Perhaps the biggest benefit is confidence. When you know what’s happening under your kayak, you fish smarter and with more patience.
Understanding Your Fishing Style
The most important step is recognizing your own habits and environment. Let’s look at the main factors that define fishing styles.
Freshwater vs. Saltwater
- Freshwater ponds, lakes, rivers: Depths are usually shallower; down imaging or CHIRP sonar may be enough.
- Saltwater or coastal fishing: Requires durable, corrosion-resistant gear and more powerful sonar for depth.
Casual vs. Dedicated Angler
- Casual Weekend Anglers: Need affordability and simplicity.
- Dedicated Anglers: Benefit from advanced features like GPS, mapping, and side imaging.
Structure Seeker vs. Explorer
- Structure Seekers: Prefer detailed imaging beneath and around the kayak.
- Explorers: Rely on GPS and mapping to mark spots and return to productive waters.
Tournament Anglers
Tournament fishing is highly competitive. Pros benefit most from live sonar, larger screens, and high-precision mapping.
Key Features in a Kayak Fish Finder
When shopping, focus on the following elements.
Screen Size
- 3.5” to 5”: Perfect for beginners or compact kayaks.
- 7” and above: Best for detail, split-screen use, and pro setups.
Sonar Technology
- CHIRP Sonar: Standard in most units, clear and reliable.
- Down Imaging (DI): Great for vertical jigging or spotting structure directly below.
- Side Imaging (SI): Expands your coverage by scanning left and right.
- Live Sonar: Real-time view, showing lure action and fish movement.
GPS and Mapping
Essential for navigation and marking hotspots. Some models include preloaded maps with bathymetric detail.
Portability and Mounting
Kayaks vary in design. Ensure your fish finder has a mounting system that works with gear tracks, RAM mounts, or scupper placements.
Battery Power
Entry-level units can run all day on a small 12V 7Ah battery. Advanced units with big screens and live sonar need larger lithium batteries.
Matching Fish Finders to Fishing Styles
Here’s how different models align with styles.
Beginners – Simplicity and Affordability
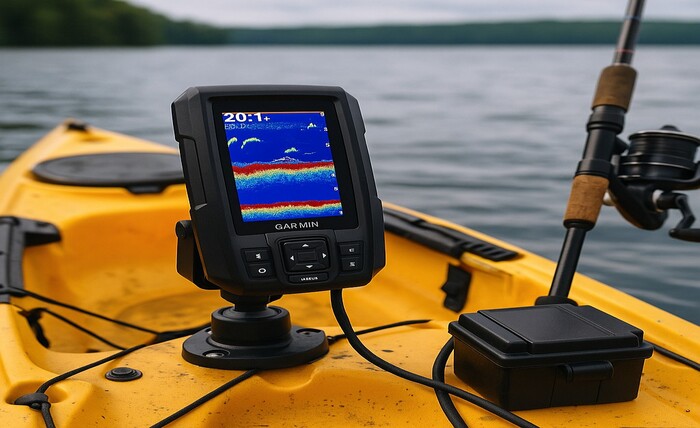
- Garmin Striker 4: Compact, easy to install, with GPS waypoints.
- Why it fits: Affordable, user-friendly, and reliable for learning.
Intermediate – Balance of Features
- Humminbird Helix 7 Mega SI GPS: Offers side and down imaging plus mapping.
- Garmin Echomap UHD2 73sv: Touchscreen, expandable with LiveScope later.
- Why they fit: Provide flexibility and mapping for anglers who fish multiple waters.
Pros – Tournament and Advanced Fishing
- Garmin LiveScope Plus: Real-time imaging for pro-level precision.
- Lowrance Elite FS 7: Excellent networking, ActiveTarget live sonar.
- Why they fit: Deliver unmatched clarity and integration with other gear.
Tips for Installation and Setup
Mounting the Display
Keep your screen within arm’s reach but clear of your paddle stroke. Gear-track mounts or swing-arm systems are most popular.
Transducer Placement
Options include scupper hole mounts, over-the-side arms, or in-hull setups. Correct placement ensures accurate readings.
Powering the Unit
Place your battery in a dry storage area. Lithium batteries are lighter, while sealed lead-acid batteries are cheaper but heavier.
Cable Management
Use waterproof connectors and secure wiring with clips or tubing to avoid tangling while paddling.
Insights from KayakBasics
KayakBasics.com highlights three priorities for gear setup:
- Keep it Simple – Choose a fish finder that matches your skill level. Overbuying leads to frustration.
- Think Safety First – GPS and mapping are more than conveniences; they are lifesaving tools in remote waters.
- Match Your Kayak – Compact kayaks benefit from smaller units, while fishing kayaks with wide decks can handle larger screens.
Community Advice
Anglers across forums echo the same advice: start simple.
On Reddit, one user said:
“If this is your first one, go with the Garmin Striker 4. You can always upgrade later.”
Another added:
“For offshore, I’d recommend at least a 6” screen with side imaging. Anything smaller is tough to see in bright light.”
This shows how real anglers tailor their fish finder choice to fishing style and environment.
Step-by-Step Buying Checklist
- Identify your waters: Freshwater ponds? Deep lakes? Saltwater bays?
- Decide your style: Casual trips or competitive tournaments?
- Pick screen size: Small for portability, large for advanced use.
- Choose sonar type: DI, SI, CHIRP, or live sonar.
- Check GPS options: Essential if you explore or fish large areas.
- Plan battery setup: Make sure your power matches the unit’s needs.
- Match to kayak space: Ensure mounting compatibility.
- Set budget range: $150 for beginners, $500–$700 for mid-tier, $1500+ for pros.
FAQs
Q1: Do I need a fish finder for kayak fishing?
Not required, but it increases efficiency, safety, and success dramatically.
Q2: What’s the best budget option in 2025?
The Garmin Striker 4 remains the top budget-friendly kayak fish finder.
Q3: Can I use one unit on multiple kayaks?
Yes, with portable mounts and battery packs, you can transfer easily.
Q4: How long will my battery last?
A 12V 10Ah battery powers mid-sized units for 6–8 hours; larger setups may need 20Ah or more.
Q5: Is side imaging worth it?
Yes, especially for large lakes and rivers where covering water is key.
Conclusion
Choosing the right kayak fish finder isn’t about buying the most expensive model. It’s about understanding your fishing style, environment, and goals. Beginners can thrive with simple, affordable models like the Garmin Striker 4. Intermediate anglers benefit from flexible units like the Humminbird Helix 7 or Garmin Echomap UHD2, which provide balance between clarity and navigation. For pros and tournament anglers, advanced systems such as Garmin LiveScope Plus or Lowrance Elite FS 7 deliver the ultimate advantage.
By aligning your purchase with your style, you’re not just buying electronics—you’re investing in confidence, safety, and success on the water. Whether you’re casting in shallow ponds or competing on massive lakes, the right kayak fish finder will elevate your fishing to the next level.